Introduction
From my years working with electrical panels, I’ve seen many breaker issues that people overlook until faults start to show. The most common signs include damage from overloading or general wear and tear that can fail the functioning of your circuit. Knowing how to spot a faulty breaker early is necessary to protect your home and ensure safety.
A solid step-by-step approach can help you determine when it’s time to replace a breaker. This guide is on how to replace a circuit breaker based on a complete hands-on overview, providing a personal article-style walkthrough. With each step, I’ll show you how to safely remove and install a new breaker without risking hazards or further damage to your circuits. You can also read about testing of circuit breaker.
Resetting a Tripped Breaker the Right Way
Initially, locate the electrical panel, often a metallic enclosure situated in the garage, basement, or utility room. The door should be opened, and the index should be used to determine which breaker relates to the affected region where the power has been lost.
Unplug any appliances connected to the circuit, then check if the breaker is in the middle of the on and off positions—this means it has tripped due to faults, overloaded circuits, or a short in the current flow.
Locate the tripped breaker, then move the switch fully to the off position before clicking it back to on. You should feel a click when it’s reset properly.
If the breaker trips again immediately, the cause might be a ground fault or something more serious in the building wiring—don’t force it.
Once reset, check that power is restored to the room and that everything is working as expected. From my own experience, identifying the marked breakers and knowing how they’re labeled can save time.
Troubleshoot the circuit
Commence by deactivating all lights and disconnecting any appliances linked to the circuit. Carefully touch each plug and check the terminals for overheating—a hot device or component may signal a problem in the flow of electrical power.
Reset the breaker, and if it trips again or doesn’t stay on, it may not be the breaker failing—the cause could be a faulty fixture, damaged wiring, or a short. Test each appliance one by one to determine what’s causing the issue.
If an appliance repeatedly trips the circuit breaker, either dispose of it or get it repaired. From experience, isolating the source of the tripped circuit with a simple switch test has helped reset the system without replacing parts unnecessarily.
Test the circuit breaker correctly
Start by turning off the main breaker to cut power to the entire panel. Then, loosen the screws and remove the metal frame to expose the electrical breakers, taking care not to touch any wires unnecessarily.
Locate the suspect breaker on the exposed panel and carefully unscrew the screw that holds the supply wire. Remove the breaker from its position to test it outside the live setup for safety.
Set your multimeter dial to measure ohms, and place one lead on the terminal where the wire connects and the other probe on the supply side. A proper reading here is critical in evaluating whether the breaker is still functioning.
With the breaker off, if the meter displays 0L, it indicates very high resistance, which is expected. Repeat the process with the breaker turned on—if it still shows 0L, the breaker is likely malfunctioning.
In such cases, it’s essential to replace the breaker. A burnt smell, visible damage, or lack of proper continuity during testing confirms the need for replacing the unit.
I’ve found many times that making solid contact between probes and points during this step avoids false readings. A faulty reading might also come from a loose probe or a poorly seated dial set.
Replace the faulty circuit breaker
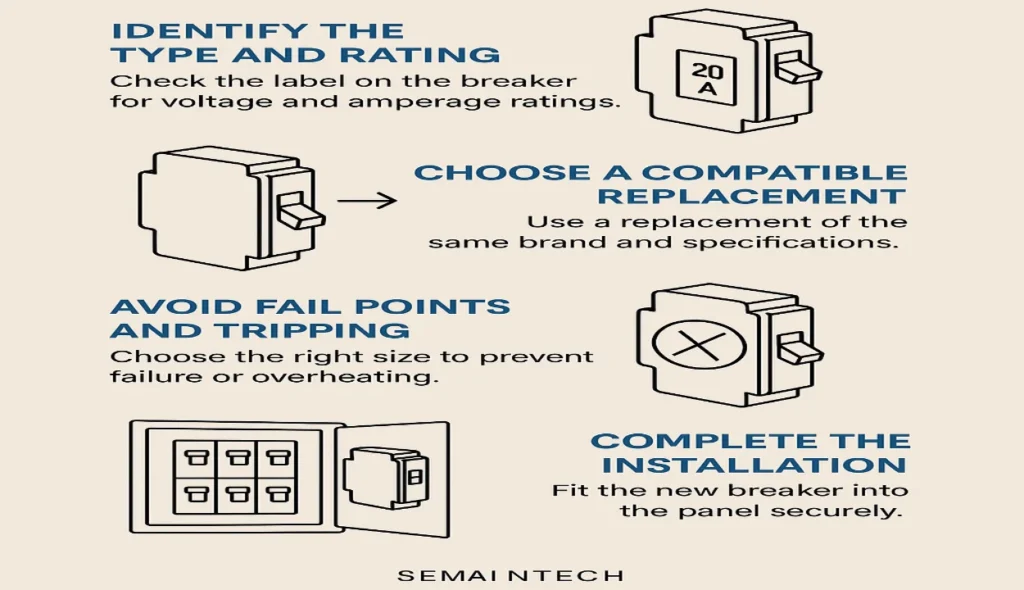
Step 1: Identify the type and rating
Before removing anything, it’s important to check the label on the faulty breaker. Determine the type, voltage, and amperage rating by checking what’s marked on the front. A malfunction could look minor, but if it’s the wrong type, replacing it with the same specs is critical to avoid safety hazards.
Step 2: Choose a compatible replacement
Choose a replacement breaker from the same brand or one that is listed as compatible with your electrical system or panel. I have seen issues where incompatible brands or sizes caused improper fits and even dangerous installation mistakes—always match designs, ratings, and purposes.
Step 3: Avoid fail points and tripping risks
An available replacement may seem right, but choosing the wrong type or size can cause the new breaker to fail, trip, or overheat. Make sure it can handle the maximum current of the circuit it is designed for to prevent serious hazards.
Step 4: Complete the installation with care
When you reach the final stage, make sure that the new breaker is properly aligned and that it is installed securely into the panels. Always ensure it fits snugly and isn’t loose. I always double-check the rating, front markings, and designs to confirm they match the original before finishing the job.
How to change a circuit breaker
Power down the right way
Before replacing anything, locate the main breaker in the service panel and flip it to the off position. This will shut down all branch circuits, so have a flashlight ready in case it gets dark. I always wear safety glasses and stand to the side, keeping my eyes away while turning the breaker on or off—a habit designed to protect against the rare possibility of an explosion. Though the chance is remote, this simple measure has saved my vision while working on tight panels. Every step, even your position during the transition, matters for your safety.
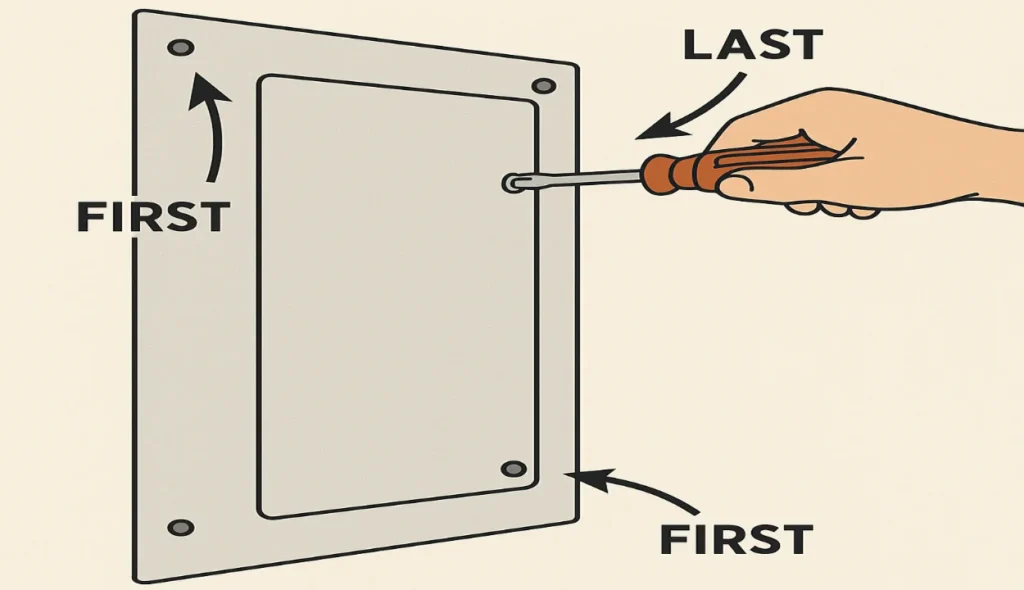
Remove the breaker panel cover plate
To begin, remove the screws from the panel cover plate, starting with the corner ones first and leaving the middle two for last. Gently loosen the remaining screws while holding the cover to keep it from falling to the ground. Be cautious not to let it tip into the panel—set it away carefully once free.
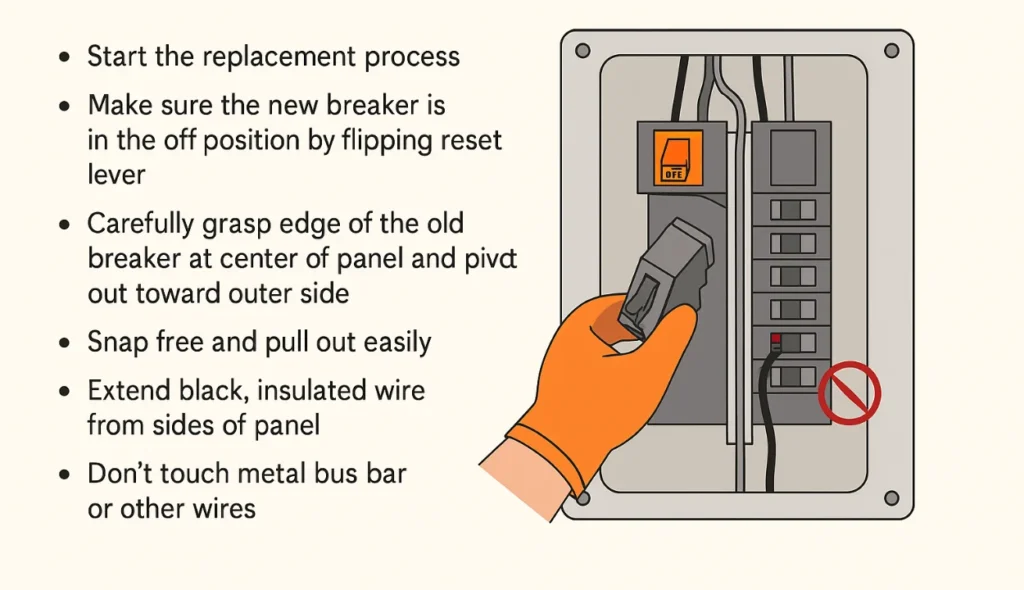
Remove the old circuit breaker
To start the replacement procedure, ensure that the new breaker is in the off position by turning its reset lever. Then, gently hold the edge of the old breaker in the middle of the panel and rotate it out toward the outside. It should snap free and pull out easily. Next, gently extend the black, insulated wire from the sides of the panel, being cautious not to touch other wires or the metal bus bar. Once free, it is inactive and no longer in physical contact with the hot bar it was attached to.
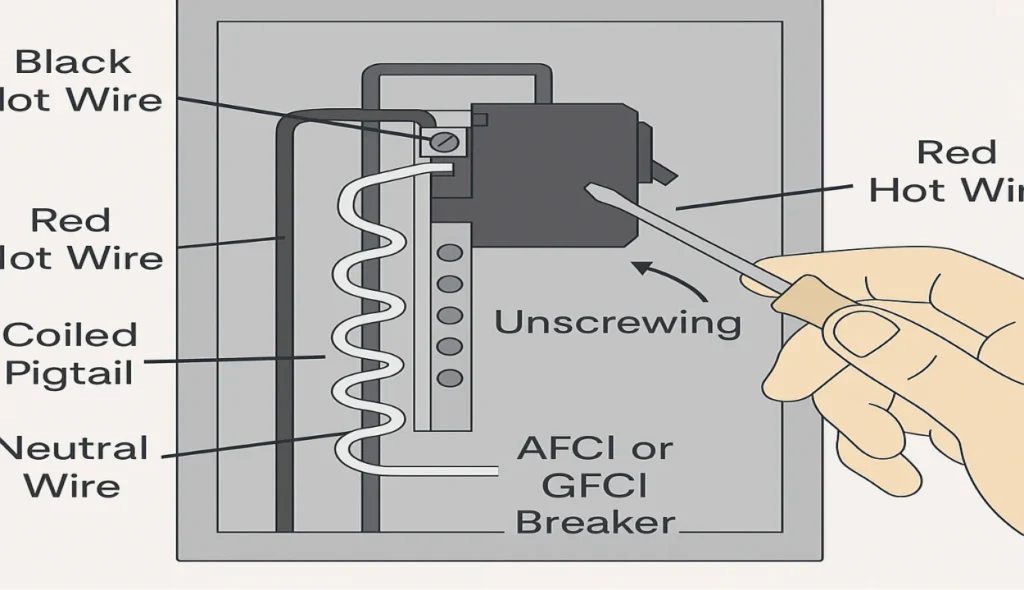
Disconnect the wires
Start by loosening the terminal screw holding the black wire connected to the old breaker—if it’s a 240-volt circuit, also disconnect the red hot wire. Whenever you are changing an AFCI or GFCI breaker, it is imperative that you remember to separate the neutral white wire and the coiled pigtail that is connected to the bus bar. Carefully loosen the set screw and begin extracting the wire from its lug on the panel. I always double-check that all wires are fully disconnected before removing anything else.
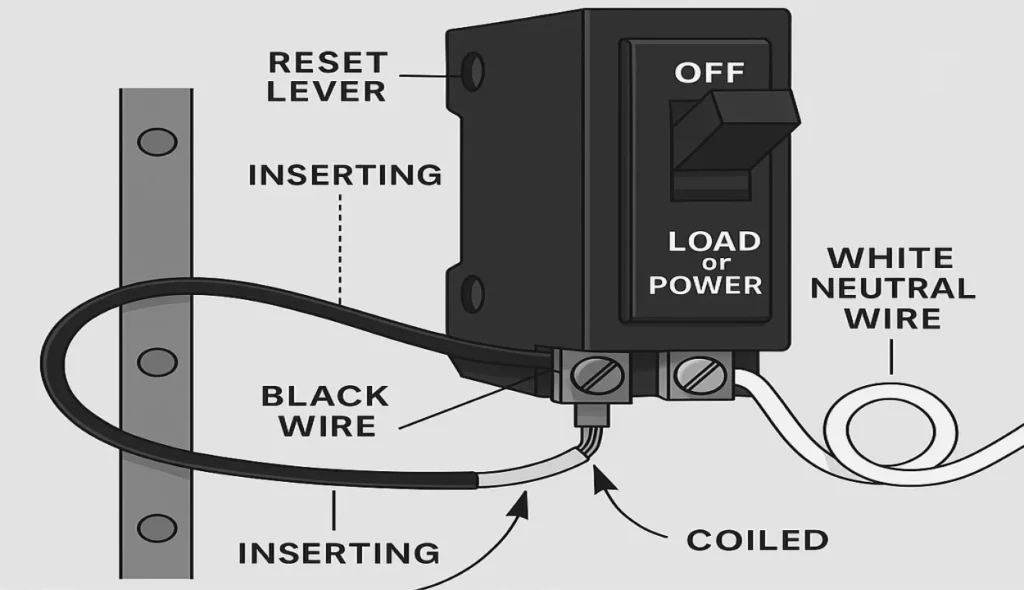
Attach the wires to the new circuit breaker
Before you install the new breaker, make sure its reset lever is turned to the off position. Then, attach the black wire by inserting its bare end under the screw terminal and tightening it securely—often labeled LOAD or POWER. When replacing an AFCI, GFCI, or combination breaker, attach the white neutral wire to the correctly labeled terminal. Older models use a coiled white wire attached to the bus bar in the panel, but many new breakers use a plug-on configuration, so that part may not be needed if the panel is made for it.
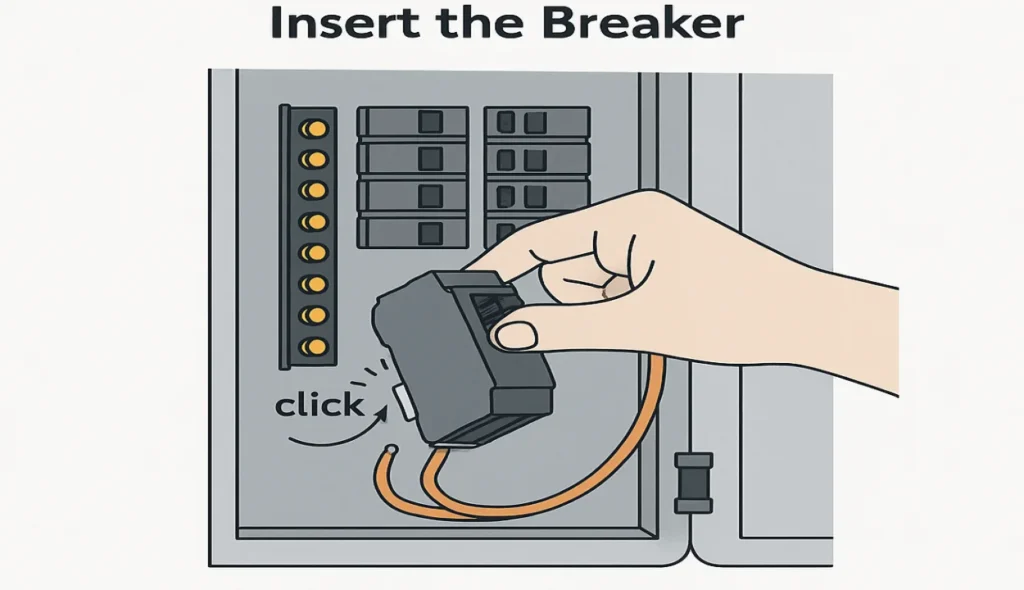
Insert the Breaker
Start by attaching the rear of the new breaker onto the holding clip at the panel and gently push it forward into position. You may need a little force—just make sure it aligns with the bus bar, and you’ll feel a click when it snaps in. Then tuck any excess wire into the empty space along the side, folding it neatly. Always be careful not to touch other wires or exposed metal parts during the installation.
Replace the panel and turn the power on
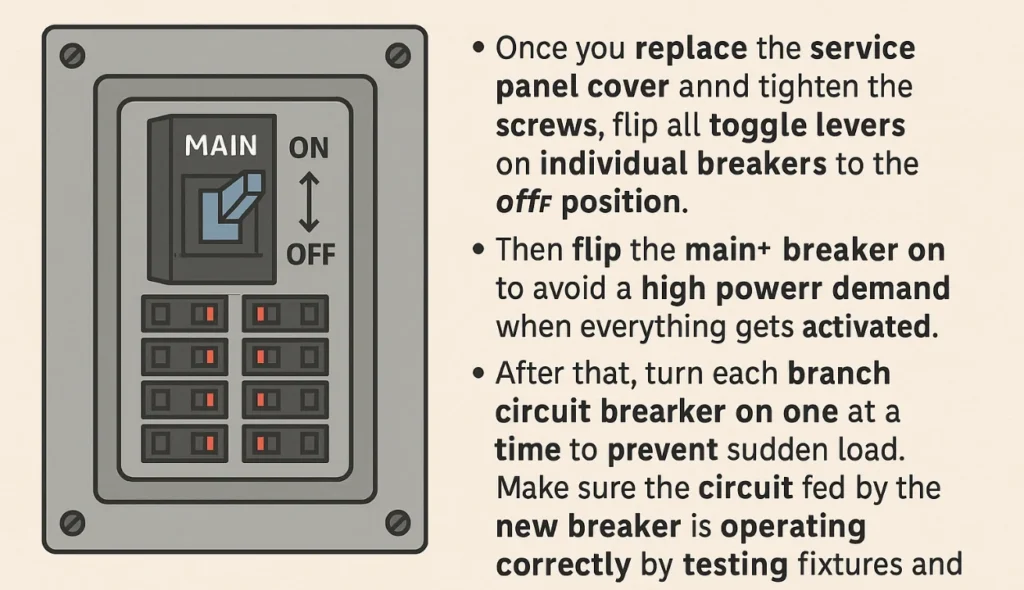
After replacing the service panel cover and fastening the screws, turn all the individual circuit breakers to the off position. Then flip the main breaker on to avoid a high power demand when everything gets activated. After that, switch each branch circuit breaker on one at a time to avoid abrupt load. Verify that the circuit connected to the new breaker is working properly by testing the lights and outlets it supplies.
FAQs
Can I replace a circuit breaker myself?
Yes, circuit breakers are usually inexpensive and easy to replace if you have a basic understanding of electrical wiring and feel comfortable working without the safety cover. However, if you’re nervous, have an older setup, or want to avoid the risk of shock, it’s best to call a professional who can safely navigate the process.
Can you replace a breaker without turning off the main?
While electricians sometimes replace individual breakers without shutting off the main power, the safest method for DIYers is to turn off the entire supply. This stops the power in the two hot bus bars running through the service panel, helping to prevent serious accidents when working inside the circuit panel.
Can I replace a 15-amp breaker with a 20-amp breaker?
You can upgrade from a 15-amp breaker to a 20-amp, but first check if your home’s wiring, outlets, and circuit are rated for the higher capacity. Installing a 20-amp breaker on a line intended for 15 amps could cause overheating, short-circuiting, or even electrical fires if you don’t update the system properly.