Introduction
Wiring a circuit breaker panel correctly is an important task to ensure home safety and the efficient distribution of electricity. Whether you’re a DIY enthusiast or a professional electrician, following the right wiring techniques and key steps is essential for a successful wiring project. Performing this task with a careful approach can help avoid danger and ensure everything is done correctly.
When you take on this wiring project, you must understand the process thoroughly and approach each step with precision. Ensuring that all the connections are made in the right order is crucial for safe and effective electrical work. Whether it’s for a new circuit breaker installation or routine maintenance, following best practices will keep you safe while tackling the task efficiently. In this article, we will cover how to properly wire an electrical breaker panel for safety and efficiency.
What is circuit breaker wiring?
Circuit breaker wiring is the process of connecting your electrical system to the circuit breaker panel, which acts as the main hub for distributing power to different areas of your home. This system is crucial because it helps protect your home from electrical hazards by automatically cutting off the flow of electricity when there are issues like overload, short circuits, or other electrical faults. Properly wired circuit breaker panels can reduce the risk of equipment damage, electrical shocks, and even fires, ensuring home safety.
The goal of proper wiring is to create a well-organized wiring system that meets all safety protocols and local electrical codes. Following these standards ensures that your system can handle future upgrades or growing electrical demands while keeping the power distribution efficient. By reducing system strain and making sure everything is properly connected, you will achieve a reliable electrical system that meets your home’s electrical needs and maintains long-term reliability. 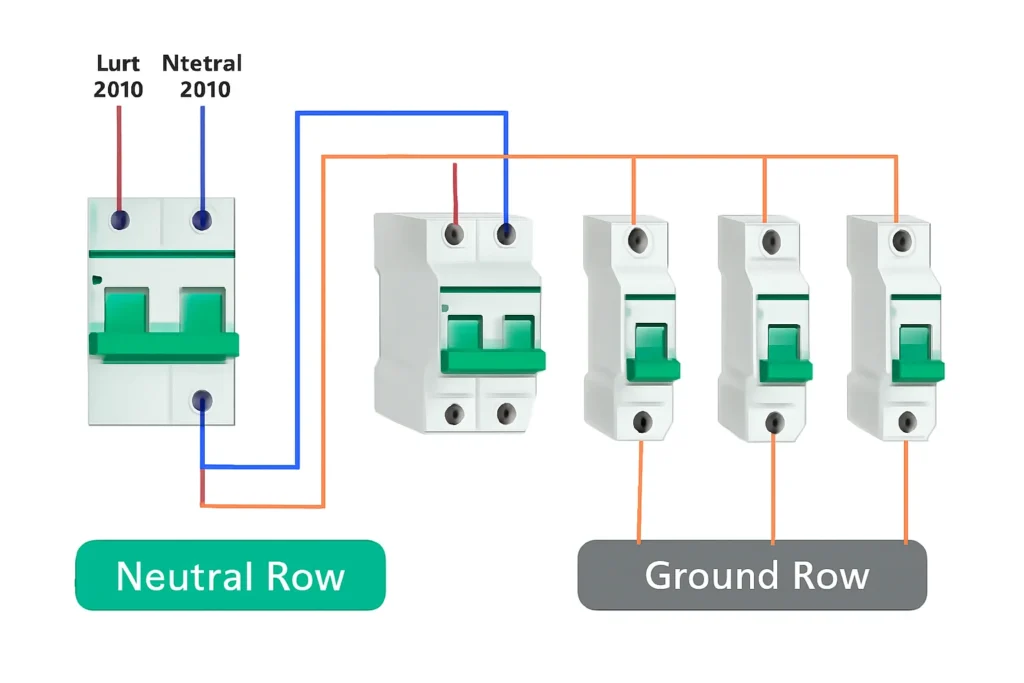
Essential Tools and Materials for Wiring
Voltage tester
Power drill
Wire strippers
Grounding wire
Grounding rod
Circuit breakers
Electrical panel
Wire cutters
Pliers
Electrical tape
Flashlight
Torque wrench
Screwdrivers (flathead, Phillips)
Cable clamps
Safety Precautions Before You Start
Before beginning your electrical work, it’s crucial to follow the proper safety precautions. First, always turn off the power at the main switch to prevent electric shock. Use a voltage tester to confirm that the electricity is completely off, reducing the risk of serious injury or death. Additionally, wear safety gear, including insulated gloves, safety glasses, and rubber-soled shoes, to protect yourself from sparks and avoid completing an electrical circuit.
Make sure your tools are properly rated tools with the correct voltage ratings and insulation for safe operation. This helps to prevent electric shock and ensures that the electrical panel is safely installed. Follow all local electrical codes and regulations to avoid unsafe conditions and potential fines or legal issues. Taking these safety measures will significantly reduce the risks associated with electrical work. You can also read about how to replace a circuit breaker.
11 Steps for Electrical Circuit Breaker Panel Wiring
1. Turn off the main power
The first and most important step in wiring your breaker panel is to turn off the main power supply. You can do this by shutting off the main disconnect switch or the electric meter, depending on your home’s setup. This action is essential to ensure that there is no electricity flowing to the circuits while you work, reducing the risk of electric shock.
Once the main power is off, use a voltage tester to verify that the panel is de-energized. This step provides safety assurance, confirming that there is no voltage present and ensuring you can safely work on the panel without any risk of injury. Always double-check to avoid any potential hazards.
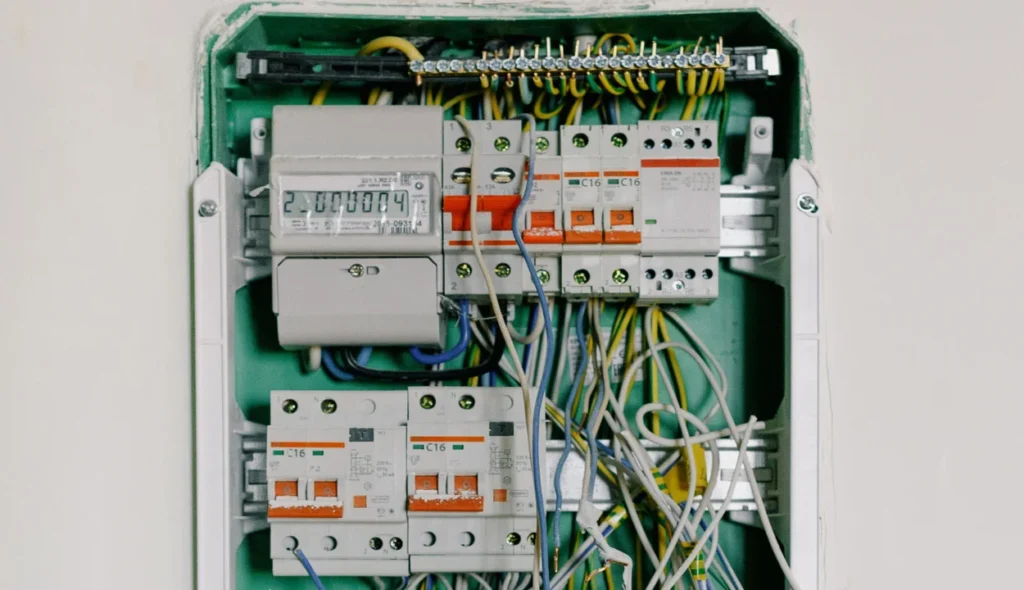
2. Identify the circuit breaker panel components
To properly wire the circuit breaker panel, you must first understand the key components. The main breaker controls the flow of electricity to the entire system, allowing you to disconnect power when needed. The branch circuit breakers manage power to specific circuits, protecting them from overloads or short circuits by interrupting electricity when necessary.
Other important components include the neutral bar, which serves as the connection point for neutral wires, and the grounding bar, where ground wires are attached to safely direct any fault current to the ground. Bus bars are metal strips that help in distributing power throughout the panel, ensuring that the entire electrical system is safely connected and functional, reducing the risk of electrical shocks and fires.
3. Plan the circuit layout
When planning the circuit breaker wiring, start by assessing the electrical load needed for each area or appliance. Calculate the total wattage or amperage required, and choose the right breaker rating for each circuit—whether it’s 15A, 20A, or 30A. Properly sizing breakers ensures that they can handle the load without tripping or creating hazards.
Next, clearly label each breaker as you install it. This will make future maintenance and troubleshooting easier, while also helping to identify which breaker controls specific circuits or areas in the house. This step is part of the electrical planning that helps keep your electrical system running safely and efficiently. Proper circuit protection is essential for managing power distribution and reducing the risk of accidents.
4. Install the circuit breaker panel
When you begin installing the circuit breaker panel, first find a suitable location that is dry, accessible, and free from physical damage. Ensure the panel has enough clearance around it for safe operation and future maintenance. The space in front of the panel should comply with local electrical codes to allow for easy access and avoid any potential issues.
Next, use the correct mounting hardware to secure the panel to the wall. Make sure it is level and aligned correctly to avoid operational issues. A firm attachment is key to preventing any moisture or external forces from affecting its performance. Proper installation will ensure the effective panel functions safely and reliably within your electrical system.
5. Ground the breaker panel
Grounding the breaker panel is an essential step for ensuring the safety and stability of your electrical system. Start by installing a grounding rod made from a conductive material like copper or galvanized steel into the ground near the panel. The rod must be installed to the correct depth to ensure a solid connection with the earth, helping to protect your system from electrical surges and lightning strikes.
Next, connect a grounding wire from the rod to the grounding bar inside the panel. This wire provides a safe path for electrical faults or excess electrical energy to dissipate into the ground, protecting sensitive equipment and reducing the risks of shock or fire. Proper installation of the grounding system ensures that the breaker panel is properly grounded, offering electrical protection from external factors and ensuring a reliable, safe system.
6. Route and strip the wires
To begin routing the wires, start by using a knockout punch or drill to create the necessary openings in the breaker panel. Make sure the diameter of the holes matches the size of the conduit or wire you’ll be using. Once the wires are routed through the pre-drilled holes, it’s time to strip the wire ends using a wire stripper. Be careful when stripping wire to avoid exposing too much wire, as this could lead to safety hazards.
Next, group wires and bundle wires to keep the panel organized. This helps maintain a neat and manageable system, making future maintenance and troubleshooting easier. It’s essential to use the correct wire gauge based on the current rating of your circuit breaker. Proper wire gauge selection ensures the wires can handle the electrical load safely and prevents issues like overheating while providing efficient operation.
7. Install the neutral bar and ground wires
The next step is to install the neutral bar and connect the neutral wire from each circuit to it. The neutral bar acts as the central point where all the neutral wires come together. Secure each wire properly to the bar by ensuring a tight connection to prevent any electrical faults or safety hazards.
Now, install the grounding bar and connect the ground wires (bare or green wire) to it. These ground wires must be securely fastened to the grounding bar, providing a direct path to the earth. Check that all connections are tight and properly secured to avoid any potential electrical fires, overheating, or malfunctioning circuits. You can also read about outlet wiring.
8. Installing a New Circuit Breaker
When installing a new circuit breaker, first determine the amperage required for the circuit. Check the load calculation and match it with the correct breaker size, such as 15 amps, 20 amps, or 30 amps, depending on the electrical load. The breaker specifications should align with the electrical system to avoid overloading and prevent electrical fires.
Next, insert the selected breaker into the slot in the panel, ensuring it fits snugly. Snap it into place and align it with the bus bar for proper electrical contact. Make sure the breaker is securely attached for secure operation and to avoid issues like overheating or improper connections. Proper breaker installation is essential for the safe and efficient performance of your electrical system.
9. Connect the wires to the circuit breaker
To connect the wires to the circuit breaker, start by attaching the hot wire to the screw terminal on the breaker. The black wire or red wire is usually used for this connection. Ensure the wire is properly inserted into the terminal and that the connection is secure, preventing issues like loose connections or electrical arcing.
Next, use a screwdriver to tighten the screw and ensure the connection is tight. This step is crucial to avoid overheating, fire hazards, and to ensure the electrical current flows safely. If you are installing multiple circuit breakers, repeat the process for each one to make sure all the wiring is correctly wired and functions properly within the electrical system.
10. Check for proper connections
Before you power up the panel, it’s important to do a wiring inspection. Start by checking that all wires, including hot wires, neutral wires, and ground wires, are securely fastened to their respective terminals. Ensure that each connection is tightened and properly seated to avoid loose connections that could cause electrical shorts or malfunctions.
Next, look for any exposed copper wire that may be visible beyond the terminal screws. Exposed wires can lead to shock hazards or increase the risk of electrical arcing and fires. Make sure that the wire insulation is stripped correctly and that no copper wire is exposed, ensuring that the system’s operation is safe and secure.
11. Test the circuit and perform final safety checks
After completing the wiring, it’s time to test circuits and make sure everything is operating correctly. Start by turning on the main breaker and using a voltage tester or multimeter to check each outlet and light fixture. Verify that the voltage readings match the expected levels for each circuit to ensure they are properly connected and functioning as intended.
While testing, observe the breaker panel for any signs of problems, like burning smells, sparks, or unusual noises, as these could indicate wiring issues or loose connections. If everything is running smoothly, make sure to label each breaker in the panel. Labeling ensures future maintenance and troubleshooting are easier, and anyone can quickly identify specific circuits if needed.
Conclusion
Circuit breaker wiring is a crucial part of maintaining a safe and effective electrical system. Properly wired circuits ensure reliable power distribution and protection against hazards like electrical fires, short circuits, and overloads. By following the right steps and using safe wiring practices, you can protect your home and ensure the safe operation of your electrical system.
A well-executed wiring job not only helps in managing the circuits properly but also provides protection against faults and electrical safety. With each circuit correctly wired and properly managed, your electrical system will function without causing potential hazards, allowing for smooth and safe wiring throughout your home.